How to Create a New Tenant
This guide walks you through creating a new tenant using the Zeta Alpha Platform UI. The tenant creation process sets up a complete, ready-to-use environment including authentication, storage, a default index, and essential content sources.
Prerequisites
Before creating a tenant, ensure you have:
Required for All Tenants
- Admin access to the Zeta Alpha Platform UI
- LLM credentials: Credentials for your chosen language model provider:
- OpenAI: API key and organization ID
- Azure OpenAI: Endpoint URL, API version, and one of:
- API key
- Service principal credentials (tenant ID, client ID, client secret)
- Workload identity federation (configured at the pod level)
- You will need credentials for both a primary model (reasoning, chat) and a small model (extraction, summarization)
- SerpApi API key: API credentials for federated search functionality
- Infrastructure information:
- S3 bucket names for ingestion and processing storage
- Kubernetes namespace configurations (OpenSearch, embeddings service, chat service, pipeline service)
- Embeddings service endpoints
Additional Requirements by Authentication Method
Choose one of the following based on your preferred authentication method:
For Password Authentication
- Admin user details: Email address, first name, and last name for the initial administrator account
- The admin user will receive an email to activate their account
For SSO Authentication
- OIDC Discovery Endpoint: Your identity provider's OpenID Connect discovery URL
- OAuth2 Client ID and Client Secret: Application credentials from your identity provider
- Attribute mappings: Field names for email and group memberships in your IdP
- (Optional) Group IDs for role assignments: IdP group identifiers for automatic role assignment (Member, Manager, Ingestion Manager)
Creating a New Tenant
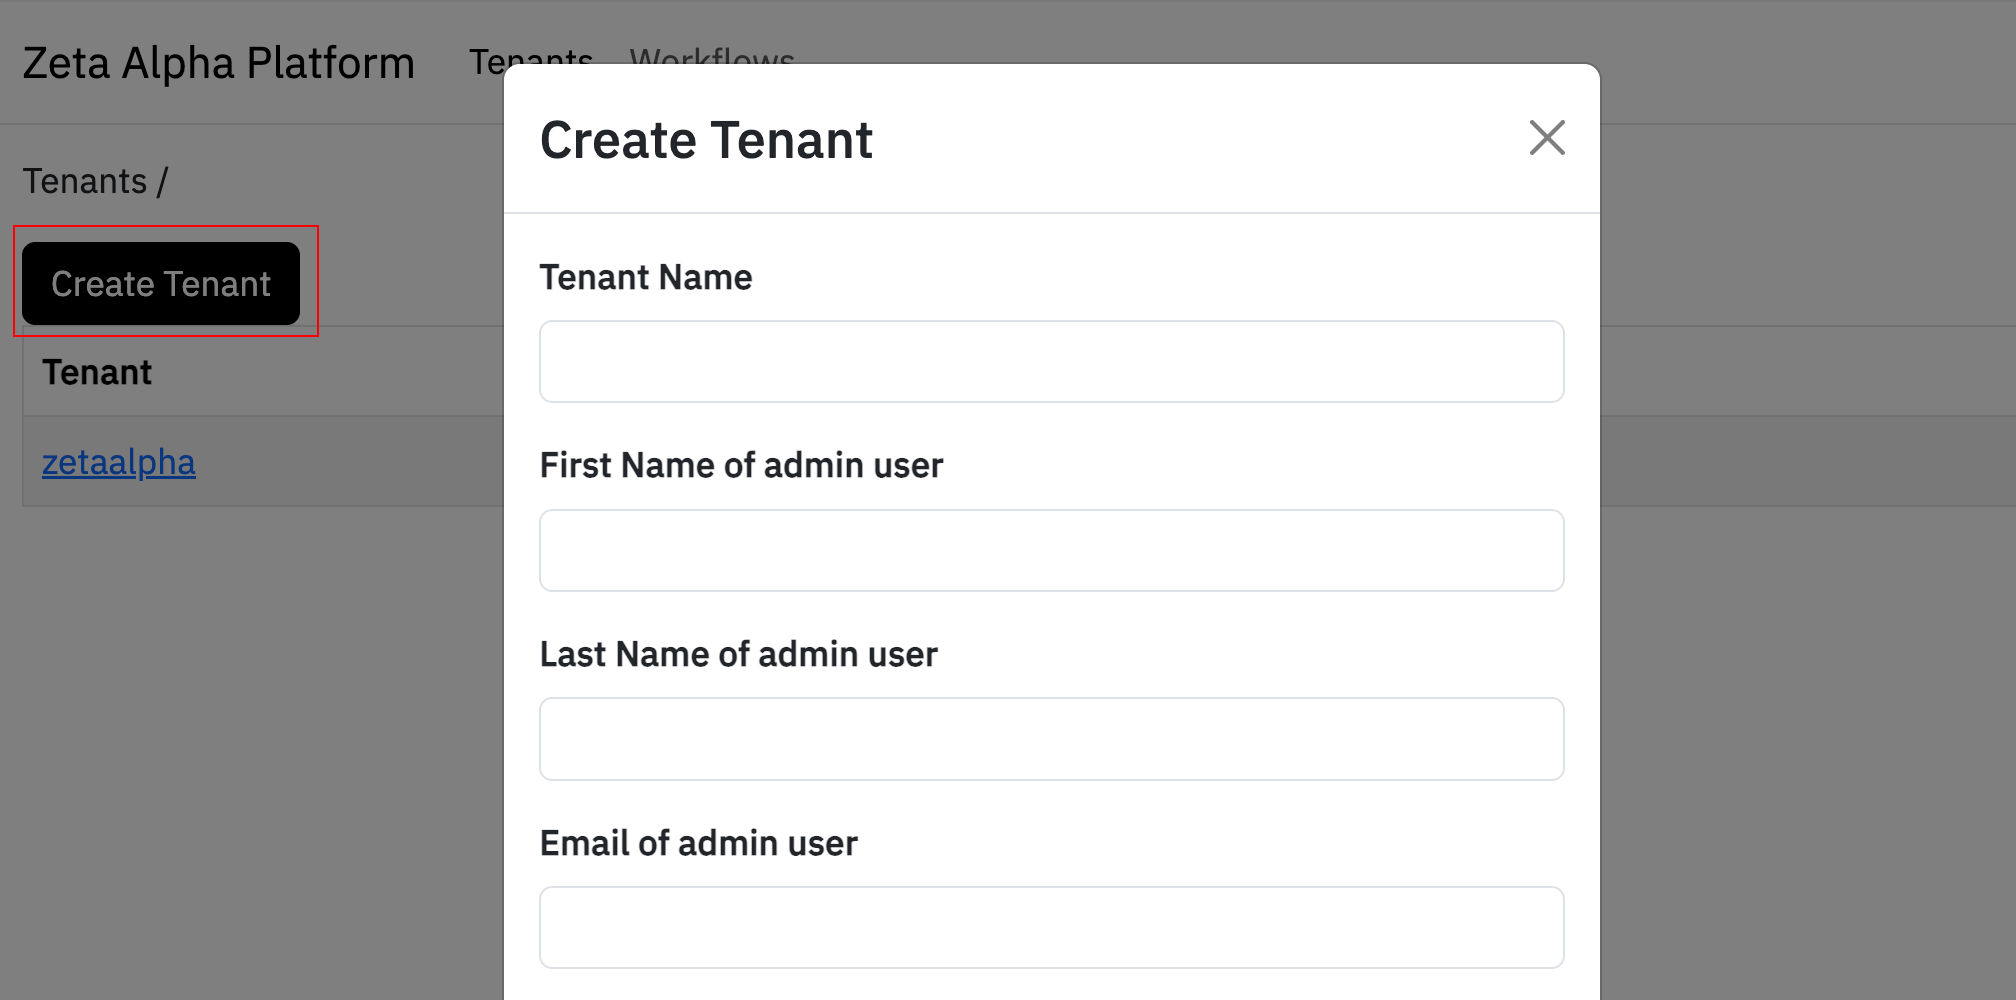
Navigate to the Tenants tab in the Zeta Alpha Platform UI and click the Create Tenant button.
The tenant creation process will automatically:
- Create the tenant with default configurations (customizable after creation)
- Set up an admin user (password authentication only) who will receive an email to activate their account
- Configure SSO (SSO authentication only) Based on your identity provider settings
- Create a default index with standard field configurations for document management
- Initialize base content sources:
user-documents-ingestion: For ingesting user-uploaded documentsnotes-ingestion: For ingesting user notes and annotationstags-enhancement-ingestion: For enhancing documents with user-created tagsuser-documents-metadata-enhancement: For AI-powered metadata extraction from uploaded documents
- Configure chat bots and AI agents for various tasks (document chat, deep research, Q&A, summarization, etc.)
- Set up federated search with "All the Web" and optionally "All of Science"
- Create a sample document demonstrating the ingestion pipeline
Base Information
Fill in the following required fields:
- Tenant Name: A unique identifier for the tenant (e.g., "acme-research"). This will be automatically converted to kebab-case format for internal use.
- First Name of admin user: Administrator's first name (only required for password authentication)
- Last Name of admin user: Administrator's last name (only required for password authentication)
- Email of admin user: Administrator's email address (only required for password authentication; used for account activation)
- (Optional) Affiliation of admin user: Organization or department affiliation (only for password authentication)
Federated Search Configuration
- SerpApi API Key: API key for enabling federated search across external sources
- Include All of Science: Toggle switch to enable/disable All of Science federated search. When enabled, users can search across academic papers in addition to the internal index and general web search.
LLM Configuration
Configure the language models that power search, chat, and data processing:
- LLM Deployment Name: Model name for primary tasks (reasoning, chat). Example: "gpt-4", "gpt-4o"
- LLM API Key: API key for the primary model
- LLM Small Deployment Name: Model name for lightweight tasks (extraction, summarization). Example: "gpt-4o-mini"
- LLM Small API Key: API key for the small model (can be the same as the primary key)
Azure OpenAI Configuration (Optional)
If you're using Azure OpenAI instead of standard OpenAI, select azure_openai as the vendor and provide the following:
- Endpoint: Your Azure AI Services endpoint (format:
https://<resource-name>.openai.azure.com) - API Version: API version for Azure OpenAI (e.g.,
2024-12-01-preview) - Auth Type: The authentication method. One of:
api_key- Provide an API key for the Azure AI Services account.client_secret- Provide the Entra ID tenant ID, App Registration client ID, and a client secret. Use this when connecting to a client-hosted Azure AI Services account via a service principal.workload_identity- Authenticate using Kubernetes workload identity federation (OIDC). The pod's service account token is exchanged for an Entra ID token. Optionally provide a tenant ID and client ID to target a specific Entra tenant and App Registration; if omitted, these fall back to pod environment variables.
You can also use Azure OpenAI through the openai vendor by setting openai_api_type to "azure", openai_api_base to your Azure endpoint (e.g., "https://<resource-name>.openai.azure.com"), and openai_api_version to the API version (e.g., "2024-12-01-preview"). This approach only supports API key authentication. The azure_openai vendor is recommended for new configurations as it supports additional authentication methods.
Infrastructure Configuration
Specify the infrastructure resources for data storage and processing:
- Ingestion Storage Bucket: S3 bucket name for storing ingested documents
- Processing Storage Bucket: S3 bucket name for processing artifacts and temporary data
- Ensure CORS rules allow tenant access to these buckets
- Embeddings Service: Service name for generating search query embeddings
- Embeddings Service Pipeline: Service name for generating document embeddings during ingestion (can be the same as Embeddings Service)
- OpenSearch Namespace: Kubernetes namespace where your OpenSearch cluster is deployed
- Embedding Service Namespace: Kubernetes namespace for the embeddings service
- Chat Namespace: Kubernetes namespace for the chat service
Note: By default, storage is configured for AWS S3. For Azure Blob Storage, see Changing Storage to Azure Blob Storage after tenant creation.
Authentication Method Selection
Choose how users will authenticate to your tenant:
Option 1: Password Authentication (Default)
Users create accounts with email and password. This is the simplest option and works immediately without additional identity provider setup.
When selecting password authentication, configure the following:
- The system will create an admin user who will receive an email to activate their account
- Admin user details (first name, last name, email, and optional affiliation) are required
Option 2: SSO Authentication (Single Sign-On)
Users authenticate through your organization's existing identity provider (Microsoft Azure AD, Okta, Google Workspace, etc.). This provides better security and a seamless experience for enterprise users.
When selecting SSO, you must configure the following settings:
Required SSO Fields
- OIDC Discovery Endpoint: Your identity provider's OpenID Connect discovery URL (usually ends with
/.well-known/openid-configuration)- Example for Azure AD:
https://login.microsoftonline.com/<tenant-id>/v2.0/.well-known/openid-configuration
- Example for Azure AD:
- Client ID: Application ID from your identity provider for this Zeta Alpha tenant
- Client Secret: Secret key from your identity provider (store securely)
- Email Attribute Mapping: Field name in your IdP containing user email addresses (defaults to "email")
- Microsoft Groups Attribute Mapping: Field name in your IdP containing user group memberships (defaults to "groups")
Optional Integration Mappings
Map user attributes to enable seamless integration with third-party services (all default to "email" if left blank):
- Slack User Attribute Mapping: Field for linking Slack accounts
- Google Drive User Attribute Mapping: Field for linking Google Drive access
- SharePoint User Attribute Mapping: Field for linking SharePoint access
Optional Group Role Assignments
Map identity provider groups to tenant roles for automatic permission assignment:
- Member Group ID: IdP group granting Member access (basic read/search permissions)
- Manager Group ID: IdP group granting Manager access (includes Member permissions plus user management)
- Ingestion Manager Group ID: IdP group granting Ingestion Manager access (document upload and management)
- Identity Provider Setup: Your IT administrator must configure the OAuth2/OIDC application in your identity provider with the appropriate redirect URI before users can authenticate. The redirect URI can be found in the tenant creation form.
- Group Mapping: Without explicit group role assignments, all SSO users receive Member-level access by default.
Accessing the New Tenant
For Password Authentication
After tenant creation, the admin user receives an email with a password setup link. Follow these steps:
- Check your email for the activation message
- Click the link to set your password
- Navigate to your tenant's Zeta Alpha Navigator URL
- Sign in with your email and new password
If email service is not configured in your environment, contact your Zeta Alpha representative to obtain the password setup link manually.
For SSO Authentication
If you configured SSO during tenant creation:
- Navigate to your tenant's Zeta Alpha Navigator URL
- You'll be redirected to your organization's login page (e.g., Microsoft, Okta, Google Workspace, etc.)
- Authenticate using your existing organizational credentials
- You'll be redirected back to the Navigator with appropriate role-based permissions
No password setup emails are sent for SSO tenants.
Customize Your Tenant
After creation, tenants have default configurations that can be customized to meet your specific needs.
Editing Tenant Configuration
- Navigate to the
Tenantstab in the Platform UI - Click on your tenant name to view the configuration (displayed as JSON)
- Click the
Editbutton to modify the configuration - Make your changes to the JSON object
- Click
Submitto save your changes
For creating indexes with custom fields, see the Create a Custom Index guide.
Changing Authentication to Use SSO
To manually enable SSO for an existing tenant:
- Navigate to the
Tenantstab - Click on your tenant name
- Click
Edit - Update the
authentication_settingsconfiguration:
{
  "authentication_settings": {
    "protocol": "oidc",
    "protocol_settings": {
      "oidc": {
        "client_id": "<tenant-name>-research-navigator",
        "issuer": "https://<your-login-url>/realms/<realm>/",
        "redirect_uri": "https://<tenant-name>-search.<your-domain>"
      }
    },
    "allow_anonymous_users": false
  }
}
Replace the placeholder values:
tenant-name: The value under the key"tenant"your-login-url: The Zeta Alpha login URL (ask your Zeta Alpha representative if unsure)realm: Your identity provider realm (ask your Zeta Alpha representative if unsure)your-domain: The domain where your tenant is hosted (e.g.,company.com)

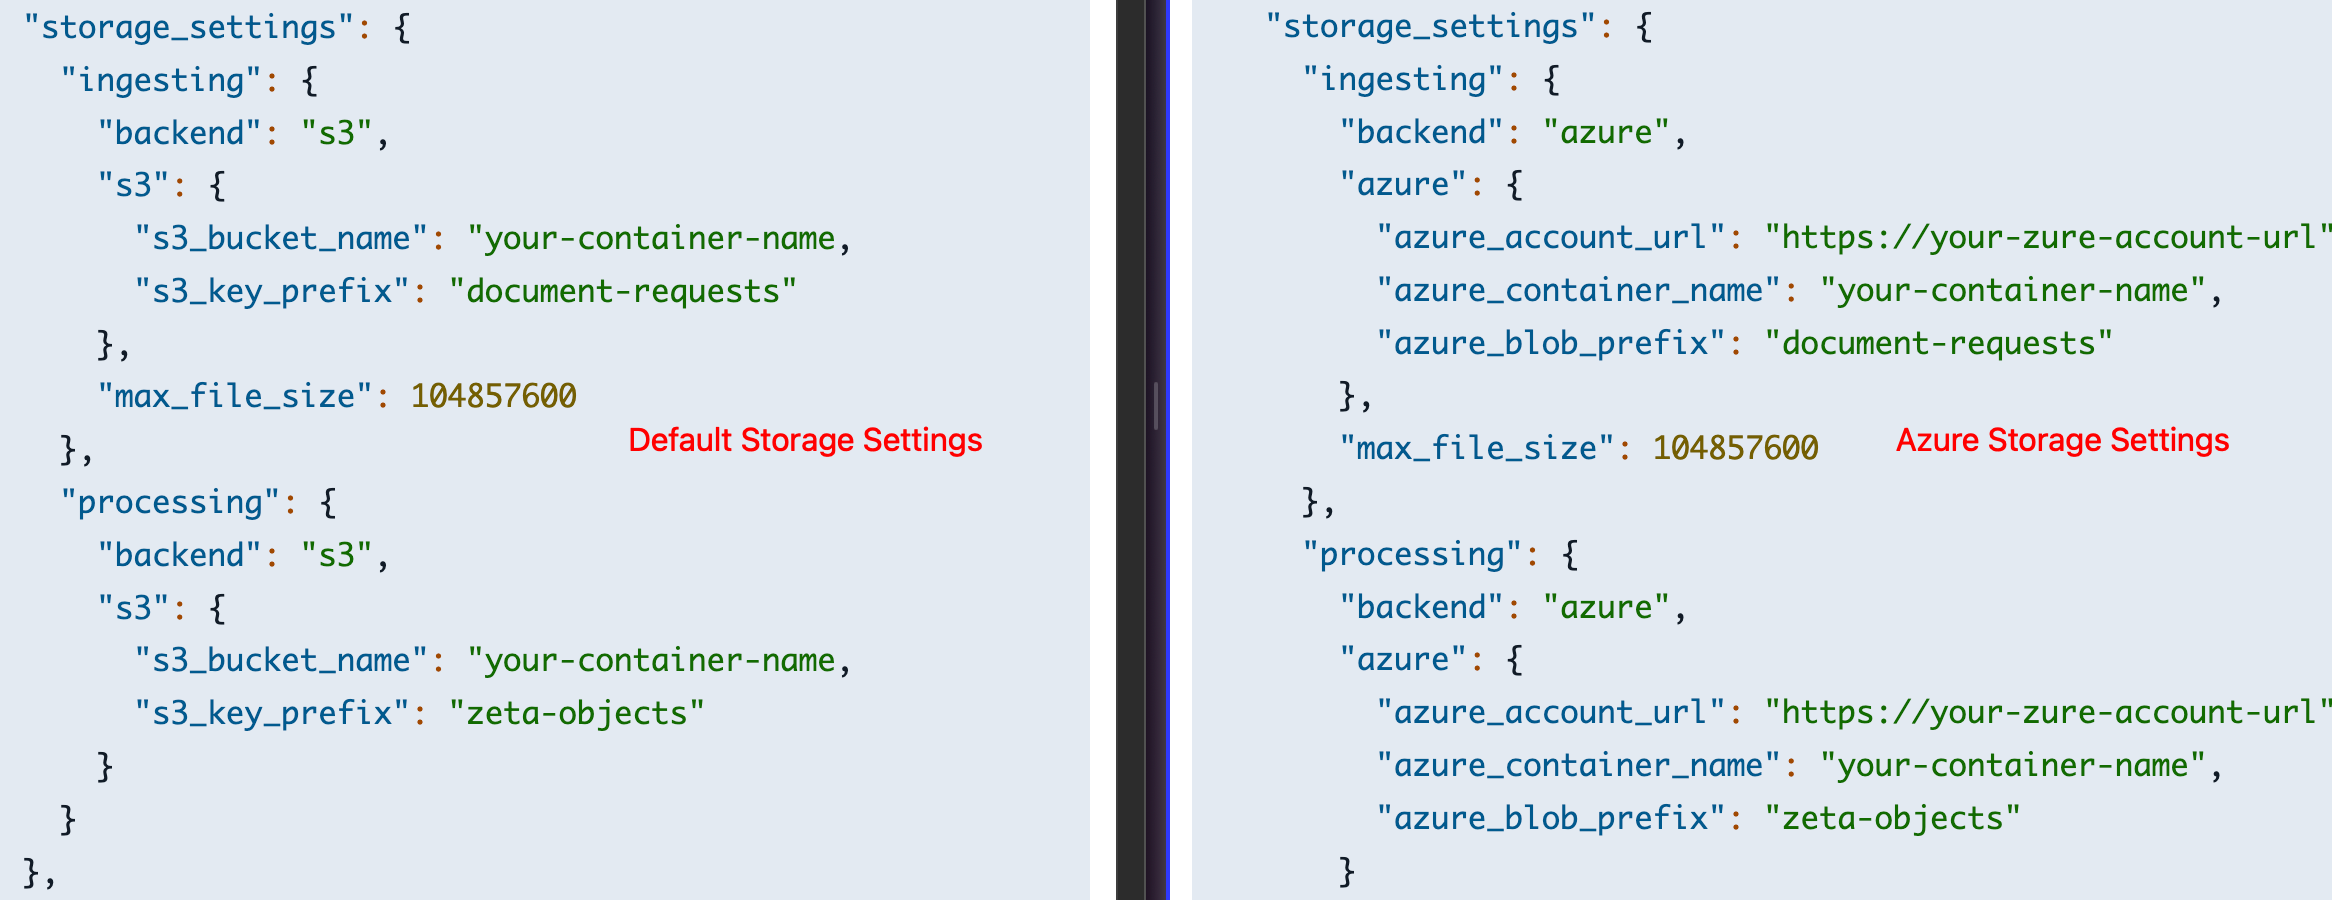
Changing Storage to Azure Blob Storage
By default, storage is configured for AWS S3. To use Azure Blob Storage:
- Navigate to the
Tenantstab and edit your tenant configuration - Change
storage_settings.ingesting.backendtoazure - Change
storage_settings.processing.backendtoazure - Replace the S3 configuration with Azure Blob Storage settings:
{
  "storage_settings": {
    "ingesting": {
      "backend": "azure",
      "azure": {
        "azure_account_url": "https://your-account.blob.core.windows.net",
        "azure_container_name": "your-container",
        "azure_blob_prefix": "ingestion"
      }
    },
    "processing": {
      "backend": "azure",
      "azure": {
        "azure_account_url": "https://your-account.blob.core.windows.net",
        "azure_container_name": "your-container",
        "azure_blob_prefix": "processing"
      }
    }
  }
}
Azure fields:
azure_account_url: (Required) Azure Blob Storage account URLazure_container_name: (Required) Container name in Azure Blob Storageazure_blob_prefix: (Optional) Prefix for organizing blobs within the container
Next Steps
- Create a custom index: Define an index with custom fields tailored to your document schema
- Generate API keys for users: Set up a user account and API key for programmatic document ingestion